
1. Preparation a. Preoperative assessment i. The patient should be in the best state of health for this elective procedure…
Thursday, November 14, 2013
Shoulder joint replacement step by step: exposure and the humeral side of the arthroplasty
i. The patient should be in the best state of health for this elective procedure.
ii. Dental hygiene as well as heart, lung, blood pressure, and urinary considerations need to be optimized and stable.
iii. The skin should be healthy and the axilla and entire upper extremity free of any scratches or other lesions.
iv. The neurologic status of the arm is documented along with the neck range of motion and the ability of the mouth to open for insertion of the airway.
v. Informed consent is obtained with explanation of the risk of pain, stiffness, weakness, nerve injury, vascular injury, fracture, loosening, instability, infection, and the need for revision surgery as well as anesthetic complications and death.
b. In the operating room
i. Foley catheters are often used for male patients.
ii. An 18 gauge intravenous catheter is inserted in the contra lateral arm.
iii. Unless there is a documented allergy to cephalosporin or major reaction to penicillin, prophylactic antibiotics – preferably Ceftriaxone and Vancomycin because of their effectiveness against Propionibacterium and coagulase negative staphylococcus – are administered prior to surgery and continued for 24 hours.
iv. General anesthesia is preferred to enable postoperative neurological examination and to avoid the potential risks of nerve blocks.
v. Anticoagulants are only used for patients with major risk factors, such as a prior pulmonary embolism.
vi. The patient is securely positioned in a comfortable low beach chair position with the glenohumeral joint at the edge of the operating table.
vii. Sequential leg compression is used during the case to avoid venous pooling.

c. The approach
i. The skin of the entire arm and shoulder is doubly prepared with Chlorhexidine.
ii. The intended skin incision is marked over the deltopectoral interval along a line connecting the mid clavicle to the mid lateral humerus.
iii. The arm is draped using an adhesive plastic drape to close off the axilla.
iv. The shoulder is approached through a deltopectoral incision. The clavipectoral fascia is incised up to but not through the coracoacromial ligament.

v. The subscapularis and anterior capsule are incised from its insertion to the lesser tuberosity with care to preserve the biceps tendon if it is intact. (Alternative techniques include subscapularis tenotomy and lesser tuberosity osteotomy). At the bottom of this post are links to other posts regarding the management of the subscapularis in shoulder arthroplasty.
i. A broad flat Darrach elevator is placed behind the humeral head and used to gently deliver the humeral head anteriorly
ii. The medullary canal of the humerus is entered from a starting point near the supraspinatus insertion. Successively larger medullary reamers are placed down the canal until the tip of the reamer just engages the endosteal surface of the diaphysis. If the reamer cannot be fully inserted for the length of the prosthetic stem, one size smaller reamer is selected. The diameter of this reamer will be the diameter of the prosthetic stem. Reaming of the endosteal surface of the diaphysis is avoided to prevent causing a stress riser at the tip of the prosthesis that could predispose the humerus to fracture.

iii. The humeral head is resected at a 45 degree angle with respect to the inserted reamer and in 30 degrees of retroversion. Care is taken to avoid injuring the rotator cuff while the head is being resected.
iv. The arthritic glenoid is managed by either a ream and run concentric reaming or by the insertion of a glenoid component.
v. The appropriate head prosthesis (diameter of curvature and height and offset) is selected to optimize mobility and stability. We use the 40/50/60 rule.

vi. If there is posterior drop back, an eccentric humeral head and or a rotator interval plication may be needed.


vii. The prosthesis is inserted using impaction bone grafting. This avoids the need for cement or bony ingrowth, each of which can complicate revision should it become necessary. This approach also strengthens the bone and minimizes the risk of periprosthetic fracture.

viii. Once the humeral component is in place, there are three critical checks. If any of these is a problem, the offending bone can be removed or, if necessary, the prosthesis can be repositioned – this is one of the major advantages of impaction grafting (you can get it wrong and still make it right).
1. Is there abutment at Pooh Corner?

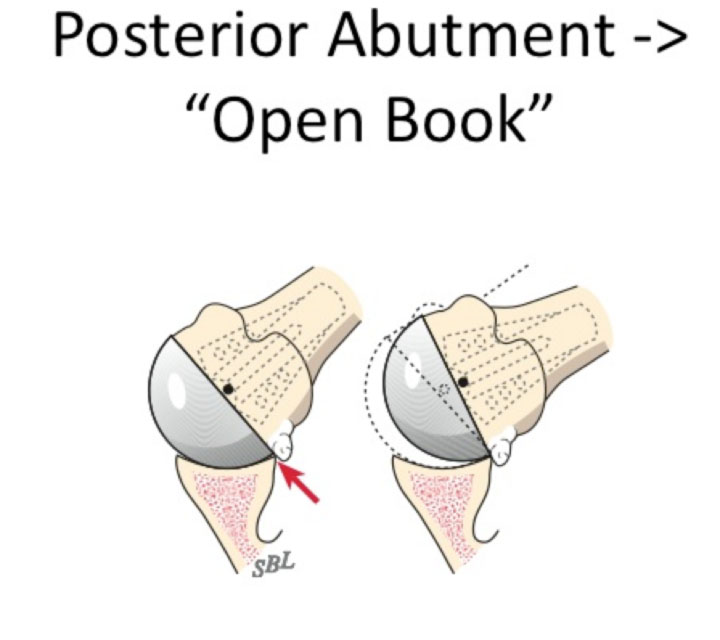
2. Is there posterior abutment leading to open booking?
3. Is the register proper (does the humeral head fit nicely in the glenoid)?

ix. Once the humeral arthroplasty is complete, the subscapularis is securely repaired to the lesser tuberosity using six sutures


Comentarios recientes